

Mastering LangGraph - The Ultimate Workshop (Part 1)
A 3-hour deep dive into LangGraph fundamentals and hands-on coding sessions

Part 2 is out now! Watch it here👇

Welcome to Part 1 of my ultimate workshop on LangGraph and Multimodal Telegram Agents!
When I started this project, I had three crystal-clear goals in mind:
Make it beginner-friendly. We’ll start with a crash course that breaks down the core fundamentals of LangGraph.
Make it hands-on. You’ll learn by building, not just watching slides fly by. Every concept ties back to a real, working project.
Make it production-ready. I’m talking full-on LLMOps, design principles, and AWS deployment. Your agent won’t just live in notebooks, they will live in the real world.
Put all that together, and what do you get?
A practical, end-to-end journey that takes you from “What’s LangGraph?” to “Look what I just built!”
The workshop unfolds in two main parts.
Part 1 - Fundamentals + Prototype
💡 That’s today’s release!
In this first part, we’ll build the foundation.
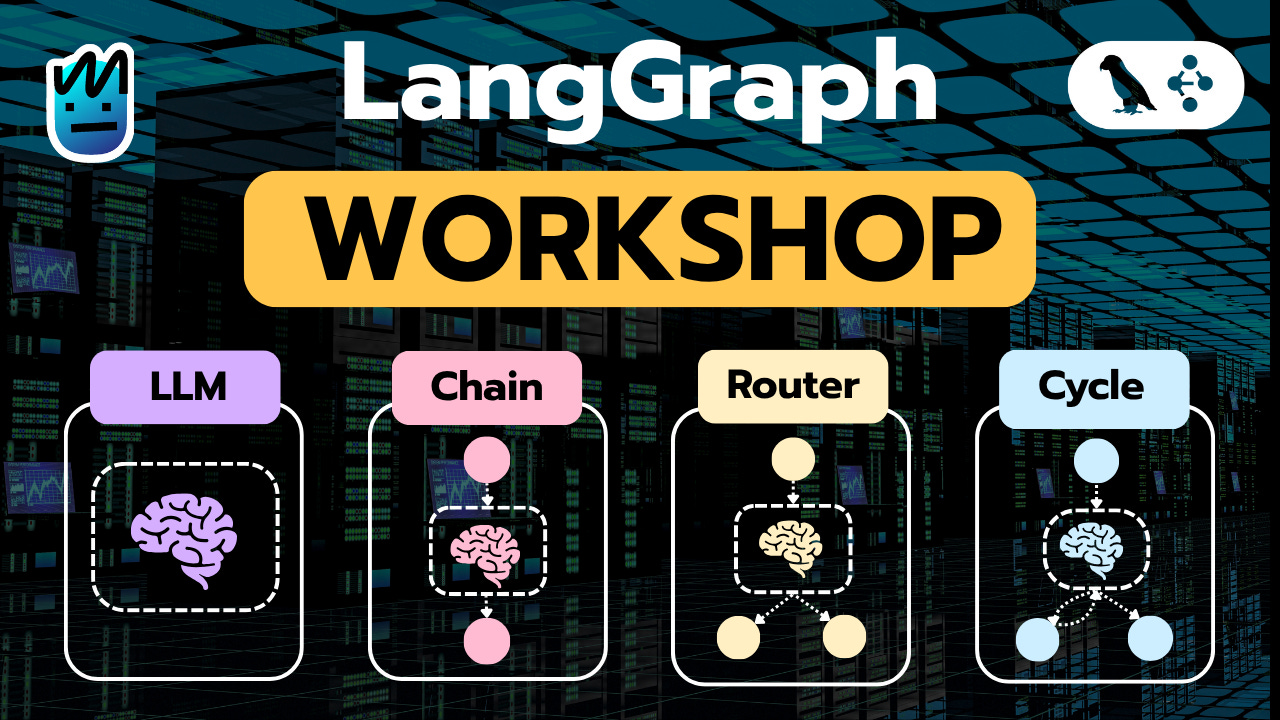
You’ll start by mastering the core principles of LangGraph, moving step by step from simple chains to ReAct loops and finally to router patterns — the same logic behind many advanced AI workflows.
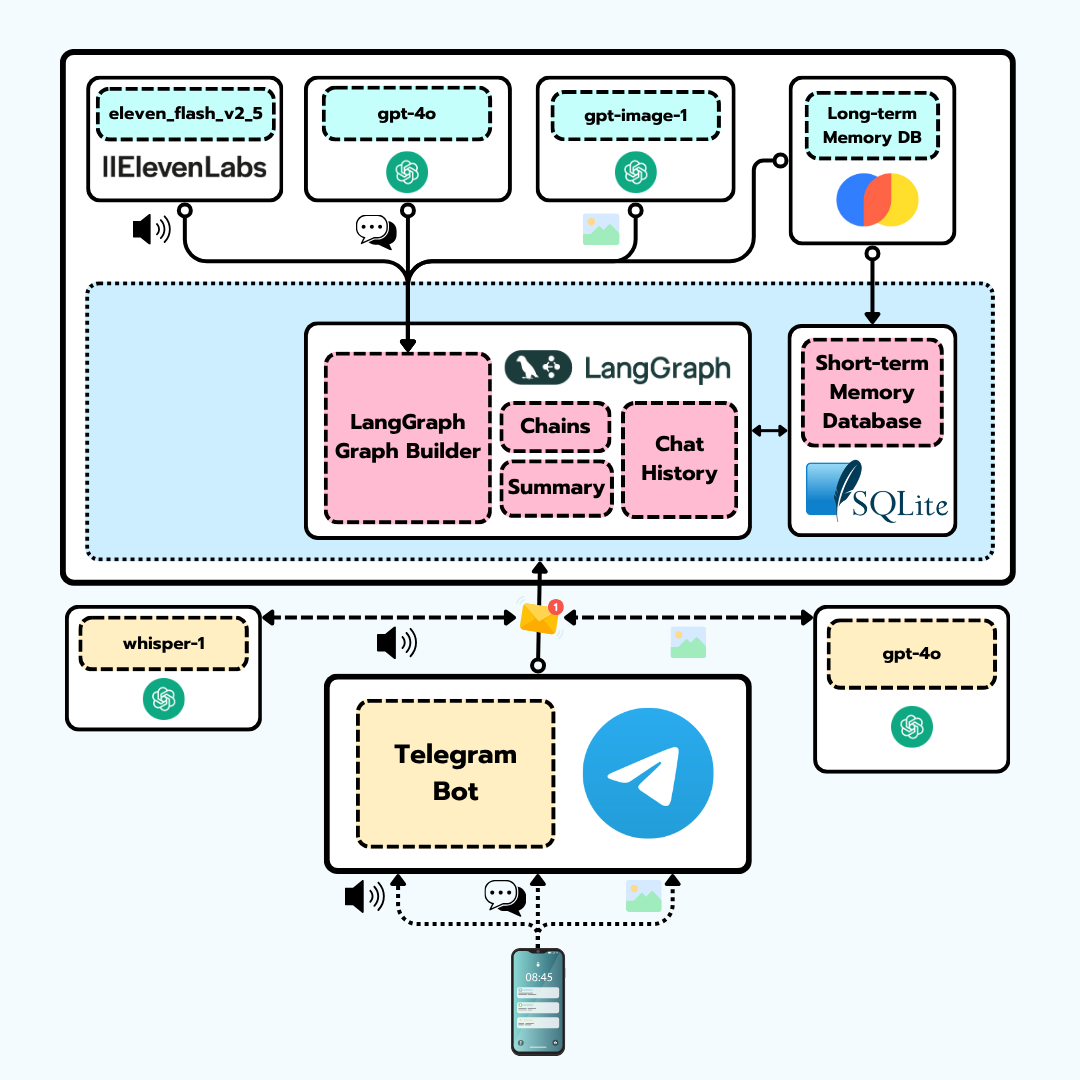
Once those fundamentals click, we’ll jump straight into hands-on coding labs inside Google Colab, where you’ll build the key building blocks of your Telegram Agent:
🔊 TTS (Text-to-Speech)
🎙️ STT (Speech-to-Text)
👁️ VLMs (Vision-Language Models)
🖼️ Image generation
And then we’ll bring it all together — connecting everything into a working Telegram prototype you can actually use and customize.
By the end of Part 1, you’ll not only have a running proof of concept, but also a crystal-clear understanding of how every piece fits together — and the confidence to start thinking like an AI Engineer.
👉 Everything you need to get started is waiting for you in the “How to Get Started with Part 1?” section below.
Part 2 - From Prototype to Production
🗓️ Releases October 15th
This is where we take your project to the next level.
We’ll cover:
🔍 How to add observability to your system
🧱 How to turn notebooks into a robust Python application
🧭 The fundamentals of LLMOps
☁️ And finally, how to deploy everything on AWS using AWS Lambda
This second part is exclusively for premiums.
So if you’re ready to go from “it works in Colab” to “it’s live on AWS”, now’s the perfect time to upgrade and join the inner circle.
Part 2 is out now! Watch it here👇
How to get started with Part 1?
I know you’re eager to dive in … so let’s get you up and running!
Here are thee simple steps to start your journey through Part 1 of the workshop.
Step 1: Download the Slides
Before jumping into the code, grab the official slides — they’ll guide you through the concepts, visuals, and diagrams I’ll reference along the way.
Step 2: Get the Code
Next, download the Google Colab notebooks from my shared Google Drive.
In the video, I’ll let you know exactly when to open each notebook, so you can follow along smoothly.
Make sure to download all the notebooks and upload them to your own Drive — that way, you can run everything directly in Google Colab without worrying about dependency issues or local setup headaches.
Step 3: Watch the Video
Finally, watch the step-by-step video walkthrough where I explain each concept and show the code in action.
☕ Pro tip: grab a good cup of coffee and find a comfy spot — this one’s a 3-hour deep dive, the longest video I’ve ever made!
If you’ve enjoyed this first part, then Part 2 is where the real magic happens.
That’s where we take this prototype and turn it into a fully running, production-ready application — complete with observability, LLMOps best practices, and AWS deployment.
Who knows? Maybe one of you will build the next million-dollar Telegram bot after this. (And if you do… please send me the link!)
See you next Wednesday, builders.
Hey can we find your articles on medium as well ?
I have subscribed to NeuralMaze, yet I have not received Part 2